Buscar este blog

Mostrando entradas con la etiqueta POP3. Mostrar todas las entradas

miércoles, 7 de agosto de 2013

Set up a CentOS 6 Postfix Email Server

The structure of the Email System

There are a number of components that make up a complete email system. Below is a brief description of each one:

Mail User Agent

This is the part of the system that the typical user is likely to be most familiar with. The Mail User Agent (MUA), or mail client, is the application that is used to write, send and read email messages. Anyone who has written and sent a message on any computer has used a Mail User Agent of one type or another.
Typical Graphical MUA’s on Linux are Evolution, Thunderbird and KMail. For those who prefer a text based mail client, there are also the more traditional pine and mail tools.

Mail Transfer Agent

The Mail Transfer Agent (MTA) is the part of the email system that does much of the work of transferring the email messages from one computer to another (either on the same local network or over the internet to a remote system). Once configured correctly, most users will not have any direct interaction with their chosen MTA unless they wish to re-configure it for any reason. There are many choices of MTA available for Linux including sendmail, Postfix, Fetchmail, Qmail and Exim.

Mail Delivery Agent

Another part of the infrastructure that is typically hidden from the user, the Mail Delivery Agent (MDA) sits in the background and performs filtering on the email messages between the Mail Transfer Agent and the mail client (MUA). The most popular form of MDA is a spam filter to remove all the unwanted email messages from the system before they reach the inbox of the user’s mail client (MUA). Popular MDAs are Spamassassin and Procmail. It is important to note that some Mail User Agent applications (such as Evolution, Thunderbird and KMail) include their own MDA filtering. Others, such as Pine and Basla, do not. This can be a source of confusion to the Linux beginner.

SMTP

SMTP is an acronym for Simple Mail Transport Protocol. This is the protocol used by the email systems to transfer mail messages from one server to another. This protocol is essentially the communications language that the MTAs use to talk to each other and transfer messages back and forth.

Configuring a CentOS 6 Email System

Many systems use the Sendmail MTA to transfer email messages and on many Linux distributions this is the default Mail Transfer Agent. Sendmail is, however, a complex system that can be difficult for beginner and experienced user alike to understand and configure. It is also falling from favor because it is considered to be slower at processing email messages than many of the more recent MTAs available.
Many system administrators are now using Postfix or Qmail to handle email. Both are faster and easier to configure than Sendmail.
For the purposes of this chapter, therefore, we will look at Postfix as an MTA because of its simplicity and popularity. If you would prefer to use Sendmail there are many books that specialize in the subject and that will do the subject much more justice than we can in this chapter.

Postfix Pre-Installation Steps

The first step before installing Postfix is to make sure that Sendmail is not already running on your system. You can check for this using the following command:
/sbin/service sendmail status
If sendmail is not installed, the tool will display a message similar to the following:
sendmail: unrecognized service
If sendmail is installed, but not running the following output will be displayed:
sendmail is stopped
If sendmail is running you will see the following:
sendmail (pid 2138) is running 
If sendmail is running on your system it is necessary to stop it before installing and configuring Postfix. To stop sendmail run the following command as super user:
/sbin/service sendmail stop
The next step is to ensure that sendmail does not get restarted automatically when the system is rebooted. The first step is to find out which run levels will automatically start sendmail. To do this we can use the chkconfig command-line tool as follows:
/sbin/chkconfig --list | grep sendmail
The above command will typically result in output similar to:
sendmail     0:off   1:off   2:on   3:on   4:on    5:on   6:off
This means that if the system boots into runlevels 2, 3, 4 or 5 then the sendmail service will automatically start. To turn off sendmail we can once again use the chkconfig command as follows:
/sbin/chkconfig sendmail off
The chkconfig tool defaults to changing the settings for runlevels 2, 3, 4 and 5. You can configure for specific runlevels using the –levels command line option if necessary.
To verify the settings run chkconfig one more time as follows:
/sbin/chkconfig --list | grep sendmail
And check that the output is as follows:
sendmail  0:off  1:off   2:off   3:off  4:off   5:off   6:off 
Sendmail is now switched off and configured so that it does not auto start when the system is booted. We can now move on to installing Postfix.

Installing Postfix on CentOS 6

By default, the CentOS 6 installation process installs Postfix for most configurations. To verify if Postfix is already installed, use the following rpm command in a Terminal window:
 
rpm -q postfix
If rpm reports that postfix is not installed, it may be installed as follows:
su -
yum install postfix
The yum tool will download and install postfix, and configure a special postfix user in the /etc/passwd file.

Configuring Postfix

The main configuration settings for Postfix are located in the /etc/postfix/main.cf file. There are many resources on the internet that provide detailed information on Postfix so this section will focus on the basic options required to get email up and running.
The key options in the main.cf file are:
myhostname = mta1.domain.com
mydomain = domain.com
myorigin = $myhostname
inet_interfaces = $myhostname
Other settings will have either been set up for you by the installation process or are not needed unless you are feeling adventurous and want to configure a more sophisticated email system.
The format of myhostname is host.domain.extension. For example if your Linux system is called MyLinuxHost and your internet domain is MyDomain.com you would set the myhostname option as:
myhostname = mylinuxhost.mydomain.com
The mydomain setting is just the domain part of the above setting. For example: 
mydomain = mydomain.com
The myorigin and inet_interfaces options use the settings we have just created so do not need to be changed (although the inet_interfaces may be commented out by default so you should remove the # at the beginning of this particular line in the main.cf file).

Starting Postfix on a CentOS 6 System

Once the /etc/postfix/main.cf file is configured with the correct settings it is now time to start up postfix. This can be achieved from the command line as follows:
/usr/sbin/postfix start
The postfix process should now start up. The best way to check that everything is working is to check your mail log. This is typically in /var/log/maillog and should now contain an entry that looks like:
Nov 21 13:05:46 mylinuxhost postfix/postfix-script: starting the Postfix mail system Nov 21 13:05:46 mylinuxhost postfix/master[10334]: daemon started -- version 2.2.5, 
configuration /etc/postfix 
As long as you don't see any error messages you have successfully installed and started Postfix and you are ready to set up a mail client and start communicating with the outside world.
To configure Postfix to start automatically at system startup, run the following command in a Terminal window:

/sbin/chkconfig --level 345 postfix on

domingo, 4 de agosto de 2013

Install Exchange 2013 on Windows Server 2012

The following section describes a step-by-step guide for the installation of Microsoft® Exchange Server 2013 Preview. The installation considers a single server deployment of Exchange Server 2013 with the Mailbox and Client Access Server roles collocated. Additional details of the topology and architecture of the lab environment which was used in the installation is described here;
Active Directory Domain Controller
Operating SystemWindows Server 2012
Forest Functional LevelWindows Server 2012
Domain Functional LevelWindows Server 2012
Exchange Server 2013
Operating SystemWindows Server 2012
Associated Server RolesMailbox Server Role
Client Access Server Role

1  Operating System Support for Exchange Server 2013 Preview

For a successful Exchange server 2013 preview installation, the following list of supported operating systems should be considered;
ComponentOperating System
Mailbox and/or Client Access Server RoleWindows Server 2012
Windows Server 2008 R2 Standard or Enterprise with Service Pack 1
Windows Server 2008 R2 Datacenter RTM or later
Management ToolsWindows Server 2012
Windows Server 2008 R2 Standard/Enterprise with SP1
Windows Server 2008 R2 Datacenter RTM or leter
Windows 8 Release preview 64-bit edition
Windows 7 64-bit edition with SP1

2  Active Directory Preparation

The first task in the installation of any version of Exchange is to prepare the Active Directory environment where the Exchange Server will be placed.
However, prior to the preparation, it should be checked against the following Network and Directory Server requirements;
ComponentOperating System
The schema master must be running any of the following:Windows Server 2012
Windows Server 2008 R2 Standard/Enterprise
Windows Server 2008 Standard/Enterprise (32-bit or 64-bit)
Windows Server 2003 Standard Edition with Service Pack 2 (SP2) or later (32-bit or 64-bit)
Windows Server 2003 Enterprise Edition with SP2 or later (32-bit or 64-bit)
Each Active Directory site should have at least one global catalog server running any of the following:Windows Server 2012
Windows Server 2008 R2 Standard or Enterprise
Windows Server 2008 Standard or Enterprise (32-bit or 64-bit)
Windows Server 2008 R2 Datacenter RTM or leter
Windows Server 2008 Standard/Enterprise (32-bit or 64-bit)
Windows Server 2008 Datacenter RTM or later
Active Directory forestWindows Server 2003 forest functionality mode or higher
Once the above requirements are verified for consistency, proceed with the following preparation tasks on the server/computer which will be used to prepare the Active Directory using the Exchange Server 2013 Preview Active Directory Prepare module.
Please note that .Net Framework 4.5 and Windows Management Framework 3.0 are already included and is not required for download or installed with Windows Server 2012 therefore skipping steps 1 and 2.
  1. Download and Install Microsoft .Net Framework 4.5
  2. Download and Install Windows Management Framework 3.0
  3. Open a Windows PowerShell session by navigating to Start > All Programs > Accessories > Windows PowerShell and enter the following command;
Install-WindowsFeature RSAT-ADDS

3 Exchange Server 2013 preview Server role prerequisite installation.

The prerequisites for Exchange 2013 preview varies on the facts of the Exchange host server operating system as well as the server role which will be associated with it. The section describes the installation of Exchange 2013 on a server containing Windows Server 2012 Operating System.

3.1 Windows Server 2012 prerequisites for Mailbox Server Role

The following section instructs the prerequisite installation that should be performed in a server running a standalone Exchange 2013 server with the Mailbox Server Role.
  1. Open a Windows PowerShell session by navigating to Start > All Programs > Accessories > Windows PowerShell.
  2. Run the following command to install the required Windows components.
Install-WindowsFeature AS-HTTP-Activation, Desktop-Experience, NET-Framework-45-Features, RPC-over-HTTP-proxy, RSAT-Clustering, Web-Mgmt-Console, WAS-Process-Model, Web-Asp-Net45, Web-Basic-Auth, Web-Client-Auth, Web-Digest-Auth, Web-Dir-Browsing, Web-Dyn-Compression, Web-Http-Errors, Web-Http-Logging, Web-Http-Redirect, Web-Http-Tracing, Web-ISAPI-Ext, Web-ISAPI-Filter, Web-Lgcy-Mgmt-Console, Web-Metabase, Web-Mgmt-Console, Web-Mgmt-Service, Web-Net-Ext45, Web-Request-Monitor, Web-Server, Web-Stat-Compression, Web-Static-Content, Web-Windows-Auth, Web-WMI, Windows-Identity-Foundation
  1. After installing the required server roles and features, Download and Install the Microsoft Unified Communications Managed API 4.0, Core Runtime 64-bit software.
  2. For Exchange Server 2013 preview, Microsoft Visual C++ 11 beta redistributable (x64) component should be removed from the system. To do that navigate to Control Panel > Program and Features.
  3. Select Visual C++ 11 Beta Redistributable (x64) – 11.0.50531 component from the program list and click Uninstall.
  4. In the Microsoft Visual C++ 11 Beta setup, click Uninstall.
  5. Click close once the uninstallation wizard completes.
  6. Download and Install the Microsoft Office 2010 Filter Pack 64 bit software.
  7. Download and Install the Microsoft Office 2010 Filter Pack SP1 64 bit.

3.2   Windows Server 2012 prerequisites for Client Access Server role

The following section instructs the prerequisite installation that should be performed in a server running a standalone Exchange 2013 server with the Client Access Server Role.
  1. Open a Windows PowerShell session by navigating to Start > All Programs > Accessories > Windows PowerShell.
  2. Run the following command to install the required Windows components.
Install-WindowsFeature AS-HTTP-Activation, Desktop-Experience, NET-Framework-45-Features, RPC-over-HTTP-proxy, RSAT-Clustering, Web-Mgmt-Console, WAS-Process-Model, Web-Asp-Net45, Web-Basic-Auth, Web-Client-Auth, Web-Digest-Auth, Web-Dir-Browsing, Web-Dyn-Compression, Web-Http-Errors, Web-Http-Logging, Web-Http-Redirect, Web-Http-Tracing, Web-ISAPI-Ext, Web-ISAPI-Filter, Web-Lgcy-Mgmt-Console, Web-Metabase, Web-Mgmt-Console, Web-Mgmt-Service, Web-Net-Ext45, Web-Request-Monitor, Web-Server, Web-Stat-Compression, Web-Static-Content, Web-Windows-Auth, Web-WMI, Windows-Identity-Foundation
  1. After installing the required server roles and features, Download and Install the Microsoft Unified Communications Managed API 4.0, Core Runtime 64-bit software.

3.3    Windows Server 2012 prerequisites for standalone Mailbox Server Role or Mailbox and Client Access Server role

The following section instructs the prerequisite installation that should be performed in a server running a standalone Exchange 2013 server with either a standalone installation of the Mailbox Server Role or a server that will host both the Mailbox and Client Access Server Role collocated.
  1. Open a Windows PowerShell session by navigating to Start > All Programs > Accessories > Windows PowerShell.
  2. Run the following command to install the required Windows components.
Install-WindowsFeature AS-HTTP-Activation, Desktop-Experience, NET-Framework-45-Features, RPC-over-HTTP-proxy, 
RSAT-Clustering, Web-Mgmt-Console, WAS-Process-Model, Web-Asp-Net45, Web-Basic-Auth, Web-Client-Auth, Web-Digest-Auth, 
Web-Dir-Browsing, Web-Dyn-Compression, Web-Http-Errors, Web-Http-Logging, Web-Http-Redirect, Web-Http-Tracing, 
Web-ISAPI-Ext, Web-ISAPI-Filter, Web-Lgcy-Mgmt-Console, Web-Metabase, Web-Mgmt-Console, Web-Mgmt-Service, Web-Net-Ext45, 
Web-Request-Monitor, Web-Server, Web-Stat-Compression, Web-Static-Content, Web-Windows-Auth, Web-WMI, Windows-Identity-Foundation
  1. After installing the required server roles and features, Download and Install the Microsoft Unified Communications Managed API 4.0, Core Runtime 64-bit software.
  2. For Exchange Server 2013 preview, Microsoft Visual C++ 11 beta redistributable (x64) component should be removed from the system. To do that navigate to Control Panel > Program and Features.
  3. Select Visual C++ 11 Beta Redistributable (x64) – 11.0.50531 component from the program list and click Uninstall.
  4. In the Microsoft Visual C++ 11 Beta setup, click Uninstall.
  5. Click close once the uninstallation wizard completes.
  6. Download and Install the Microsoft Office 2010 Filter Pack 64 bit software.
  7. Download and Install the Microsoft Office 2010 Filter Pack SP1 64 bit.

4  Prepare Active Directory and domains

To prepare the active Directory and the Domains for Exchange 2013, follow the following steps. To execute the commands, the commands should be run using the Schema Admins group and the Enterprise Admins group membership.
  1. Mount/Navigate to the Exchange Server 2013 Preview Installation Media
  2. Open up a Command Prompt session and type the following command followed by an ENTER.
setup /PrepareSchema /IAcceptExchangeServerLicenseTerms
  1. Once the execution completes, run the below command followed by an ENTER.
setup /PrepareAD /OrganizationName:<organization name>
/IAcceptExchangeServerLicenseTerms

5  Install Exchange Server 2013

If you’re installing the first Exchange 2013 Preview server in the organization, and the Active Directory preparation steps have not been performed, the account you use must have membership in the Enterprise Administrators group. If you haven’t previously prepared the Active Directory Schema, the account must also be a member of the Schema Admins group.
  1. Mount/Navigate to the Exchange Server 2013 Preview Installation Media.
  2. Start Exchange 2013 Preview Setup by double-clicking Setup.exe
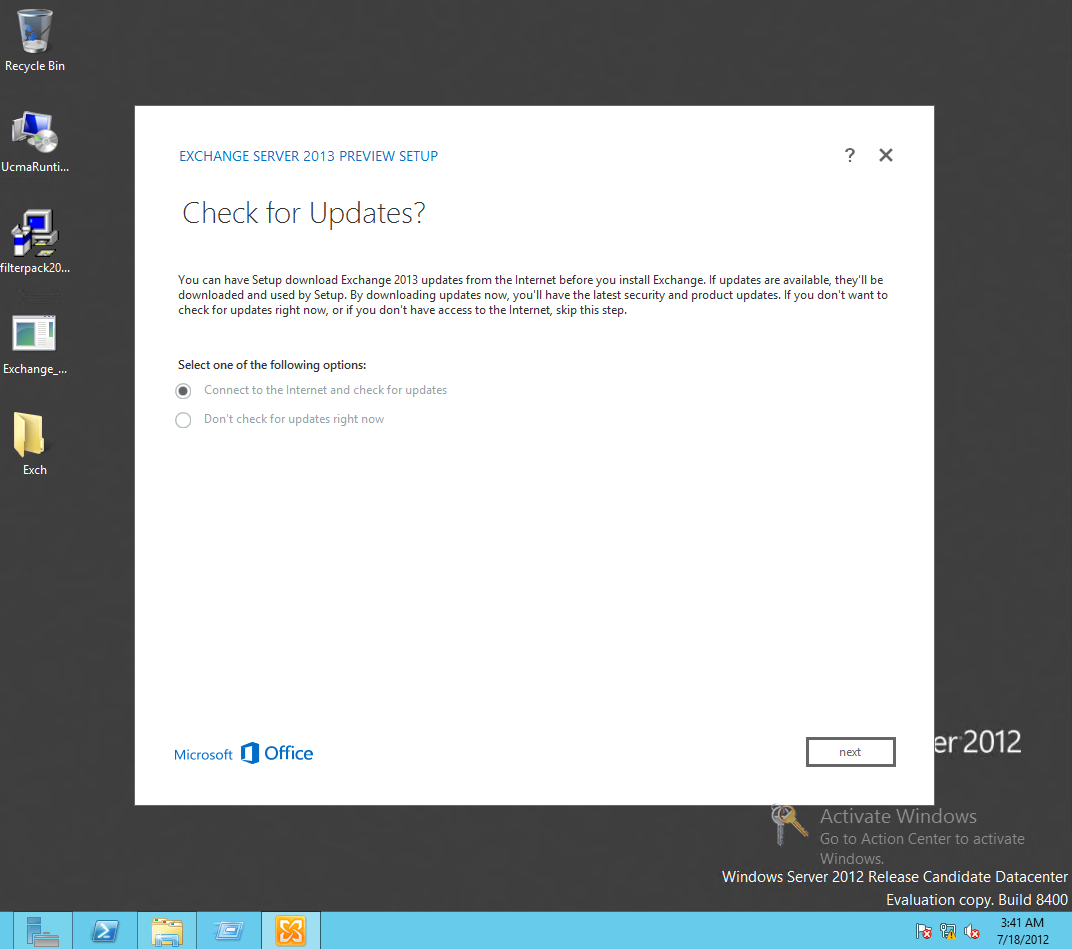
  3. On the Check for Updates page, select whether you want Setup to connect to the Internet and download product and security updates for Exchange 2013 Preview and click Next.
  4. Once the setup is finished copying files on the Copying File page, click Next.
  5. The Introduction page gives additional guidance for the installation procedure. Review the content and Click next to continue.
  6. On the License Agreement page, review the terms. If you agree to the terms, select I accept the terms in the license agreement, and then click next.
  7. On the Error Reporting page, select whether you want to enable or disable the Exchange Error Reporting feature, and then click next.
  8. On the Checking Required Software page, wait for the Setup to verify for prerequisite software checking to finish. If any applications are listed, install them and then run Setup again. If all required software is found, click next to continue.
  9. On the Server Role Selection page, choose whether to install the Mailbox role, the Client Access role or both roles on the server. For this guide both server roles were installed.
  10. On the Installation Space and Location page, either accept the default installation location or click Browse to choose a new location with adequate storage space.
  11. One of the new features of Exchange 2013 preview is the Malware Protection. If installing the Mailbox role a Malware Protection Settings page will appear. Choose whether to enable or disable malware scanning and click Next.
  12. If installing the Client Access server role, on the Configure Client Access Server external domain page, choose an option to suite your deployment. If selecting ‘This Client Access server will be Internet-facing if the Client Access server you’re installing will be accessible from the Internet’. Enter a domain name to use to configure your Client Access servers. If not, keep the space blank and click Next to proceed.
  13. On the Customer Experience Improvement Program page, choose an appropriate option, and then click Next to proceed.
  14. On the Readiness Checks page, view the status to determine if the organization and server role prerequisite checks completed successfully.If unsuccessful, perform the required tasks and click Back, and Next to run the Readiness check again.If successful, click Next to proceed.
  15. The installation will be performed.
  16. Once the setup completes the installation, on the Completion page, click Complete.
  17. Restart the computer after Exchange 2013 Preview has completed.

6   Review Exchange Installation

Once all the above tasks are performed, proceed with the below steps to verify the installation using the Exchange 2013 Administrative Center and PowerShell.
One of the cool and new feature of of Exchange 2013 is the all new ‘Exchange Admin Center’. The Exchange Administration Center (EAC) is the web-based management console in Microsoft Exchange Server 2013 Preview that allows for ease of use and is optimized for on-premises, online, or hybrid Exchange deployments. The EAC replaces the Exchange Management Console (EMC) and the Exchange Control Panel (ECP), which were the two interfaces that were used to manage Exchange Server 2010.
To navigate to the Exchange Admin Center;
  1. Open the web browser.
  2. Navigate to the bellow URL.
    https://<fully qualified domain name (FQDN) of Client Access server>/ECP
  3. Enter your username and password in Domain\user name and Password and then click sign in.
  4. Review the tabs and sections in the new Admin Center.
Time to play! Hope this guide helped you. Don’t forget to keep on checking for some exiting new posts on how to play around with the all new Admin Center as well as a step by step guide for installing Lync Server 2013 preview in the next couple of days.